Category : Nerd Stuff

Digikam 2.5 on Ubuntu Natty

Ubuntu Natty Narwhal (11.04) is almost a year old, but if you, like me, are not brave enough to upgrade to Oneiric, sometimes you find yourself forced to use outdated software. Fortunately, for many programs, backports from newer Ubuntu releases are available. Today, I am trying to install DigiKam 2.5.

A DigiKam backport is available from Philip Johnsson’s kubuntu-backports PPA. However, it is built for KDE 4.7, while Natty’s KDE is still at 4.6. So, we upgrade, using the Kubuntu Backports PPA. Now we’re almost there, except for some dependencies of DigiKam, that are not available in either PPA. These can be found in Philip Johnssons ‘extra’ PPA, but we have to be careful, because this PPA contains a lot of packages, and we surely do not want to upgrade all of those.

So, here we go. First, add the necessary PPAs:

sudo apt-add-repository ppa:kubuntu-ppa/backports
sudo apt-add-repository ppa:philip5/kubuntu-backports
sudo apt-add-repository ppa:philip5/extra

Then, make sure we don’t upgrade to packages from philip5/extra by default. Add the following to /etc/apt/preferences:

Package: *
Pin: release o=LP-PPA-philip5-extra
Pin-Priority: 1

Now you can just upgrade your system:

sudo apt-get update && sudo apt-get dist-upgrade

or use aptitude so review what will happen before you go ahead.

Garmin Zümo, Google Maps, GPSBabel

Tonight, I was looking for the best way to create a route in Google Maps and import it on my Garmin Zümo. I have found an easy way, which does not give the best results, and a way that’s a little more difficult, but will get you more or less exactly what you want. If you want to do this, you need GPSBabel.

First, you need to understand that a Garmin Zümo, and probably other Garmin devices, have a concept called “route waypoints”, which are not waypoints in the regular sense (“favorites” in Zümo-speak), but are the waypoints that a route is made up of.

The objective is, to get a route that is a “real” route in Garmin sense, meaning that it is composed of no more waypoints than necessary, all of which appear on the route as “route waypoints” (orange flags on a Zümo). This is good, because the device will always navigate to the next route waypoint, which is convenient when you have to recalculate the route underway.

The easiest way is to just create your route in Google Maps (you know, draw a line that sticks to roads and drag it around to make it suit your needs until you are done), save it to My Maps and download it as KML. Then you can use GPSBabel to convert it to GPX, which you can copy to the Garmin device:

gpsbabel -w -i kml -o gpx -f route.kml -F route.gpx

By doing this, you have to rely on the feature that allows the Zümo to convert a track into a route. So, if you didn’t know: you can import a recorded track from any source into your Zümo, and the Zümo will calculate it into a route. This approach gives you a route that matches exactly what you prepared, but has two major drawbacks:

  • Tracks are made up of many (possibly thousands) of waypoints. Having the Zümo convert this into a route takes a long time, and there is a big risk that the Zümo will not have enough memory to process the whole track, which leaves you with an incomplete route. Rendering this type of route on the map is also slower, although that may be just my impression.
  • The resulting route does not have any “route waypoints”, as discussed above. It will just have a start and finish. When you drive the route, and underway you have to recalculate the route (roadblocks, detours, you missed an exit, stuff like that), it will then calculate route directly to the finish according to the device’s route settings. Any modifications you made by hand in Google are now lost. You can get them back by reloading the route from the menu, but it’s up to you to find your way back to it.

There is another way, which does give you a route with route waypoints, it’s just a little more work.

When you drag your route in Google Maps to a diffent road, Google marks that point with a small white dot with a black border. These are our route waypoints. Create as many as you need, but not too many because of the next step.

When your route is finished, create a placemark on every route waypoint that you added. Placemarks are to Google what waypoints (the regular kind) or favorites are to Garmin. If you have a highly customized route, this can be some work. Sorry about that. Make sure that the order in which the placemarks appear in the list on the left hand side of the screen match the order in which they appear in the route. Also make sure that you do not have any placemarks that are not part of your route.

When you are done, download the route as KML. We will now use GPSBabel to construct a route from the placemarks in the KML file.

gpsbabel -i kml -o gpx -f route.kml -x transform,rte=wpt -x nuketypes,waypoints,tracks -F route.gpx

This does a couple of things:

  • Convert KML into GPX
  • Using the transform filter, create a route from all waypoints (placemarks)
  • Discard all waypoints and tracks, using the nuketypes filter

The last step is there to make sure that the Zümo will not try to import all the route waypoints as regular waypoints (so they show up in your Favorites), and we don’t need the track either. If you want to keep the track, for example to compare the results, you can leave out the tracks option from the nuketypes filter.

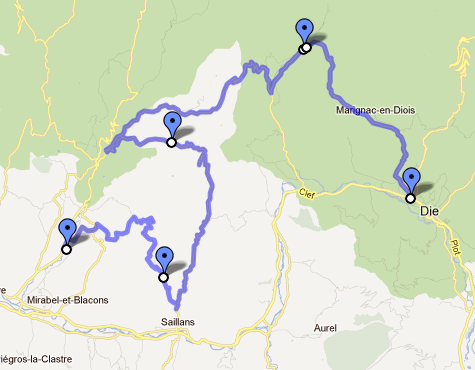
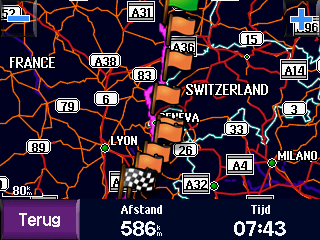
So, an example. First click here to open my example in Google maps. And here’s how the final result looks on the Zümo:

Google  thinks this route is 593 km, the Zümo thinks it’s 586 km. That sounds about right, doesn’t it?

Just one more thing to keep in mind: Google’s routing engine is different from the Zümo’s, and your Zümo also takes your settings into account when calculating, like whether to get the quickest or the shortest route, which types of roads to avoid, etc. If you want the result on the Zümo to closely match what you created in Google, make sure you have enough waypoints. The more waypoints you have, the closer they are to each other, and the fewer possible roads there are to get from one waypoint to the next. It’s as simple as that 🙂

Vaag motorritje

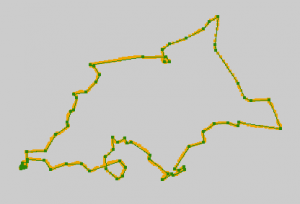
Zondag ben ik een stukje gaan motorrijden, zoals wel vaker. ‘t Is alleen nogal een maf rondje geworden, met vooral wat doodlopende stukjes:

[map id=”map3″ w=560 h=400 z=11 kmlautofit=no lat=”51.483899″ lon=”5.593414″ kml=”https://www.grendelman.net/files/gpx/20120115-track.kml” maptypecontrol=false streetviewcontrol=false]


Dit soort dingen is altijd weer aanleiding om m’n GPS tooltjes weer eens te bekijken en zo nu en dan wat nieuws uit te proberen. Zo ontdekte ik vandaag een programma genaamd ‘Viking‘. Het heeft vaag iets weg van een primitieve versie van MapSource, maar het kan ook wel wat dingen die MapSource niet kan. Ik moet er nog eens wat verder mee spelen, maar wat ik er tot nu toe mee gedaan heb, en wat prima ging, was een specifieke track uit een backup van mijn Garmin wegschrijven als GPX bestand.

Dit GPX bestand heb ik vervolgens met GPSBabel omgezet naar KML. Voor de volledigheid (en ter referentie voor mezelf) plaats ik hier de volledige GPSBabel invocatie:

gpsbabel -t -i gpx -o kml,points=0,line_color=A00000FF,line_width=4 -f <gpx-file> -F <kml-file>

Dit zorgt ervoor, dat er geen storende “placemarks” in de KML komen, en dat de track wordt weergegeven met een lijn van 4 pixels breed, in de kleur rood, met een opacity van 0xA0, wat neerkomt op ongeveer 60%.

Switching from Gnome to Xfce

I have been using an Ubuntu desktop for quite some time, running Gnome 2.30 on Lucid for the past year-and-a-half. However, with the recent developments in the Gnome- and Ubuntu worlds (everybody hating Unity and Gnome3, and Gnome 2 disappearing from Ubuntu altogether), I decided to check out Xfce and see if that would work for me.

I installed Xfce 4.8 from a PPA. Easy enough. Xfce looks nice enough, and it gives you plenty of options to configure. Besides, if you have a working Gnome environment, some things will just move with you to Xfce. For example, I have been using Avant Window Navigator in Gnome, and it was started in Xfce just the same.

I tweaked the following things to make Xfce behave the way I like it:

  • Because Awn works at the bottom of the screen, I moved Xfce’s Panel1 to the top of the screen, much like in Gnome.
  • Xfce4-settings-helper didn’t seem to be started on login, so things like keyboard shortcuts didn’t work. I start it manually in a script.
  • I use two monitors, with a double-width desktop, and the Xfce display settings don’t let me specify anything about that; as soon as xfce4-settings-helper is runing, the two screens are merely a mirror of each other. However, with xfce4-settings-editor, it is possible to specify the position. I want display ‘VGA1’ to have a horizontal offset of 1920 pixels, because both my displays are 1920×1080, so I set Displays -> Default -> VGA1 -> Position -> X to ‘1920’.
  • Interaction between ssh, ssh-agent and ssh-askpass doesn’t seem to work 100%. Every time I start an ssh session, I am asked for my key’s passphrase. To work around this, I start ‘ssh-add < /dev/null’ from the same script I mentioned above. This seems to prime the ssh-agent correctly.
  • In Gnome, I used an applet called ‘Sticky Notes’. While there is an alternative in Xfce, no doubt, I still had lots of notes on my desktop that contained infomation that I didn’t want to lose. So I installed ‘xfce4-xfapplet-plugin’, which allows you to run Gnome applets in an Xfce panel. I can now keep on using ‘Sticky Notes’ for as long as I want 🙂

The script that I mentioned above (twice), is just this:

xfce4-settings-helper
#xrandr --output HDMI2 --auto --output VGA1 --auto --right-of HDMI2
ssh-add < /dev/null

The ‘xrandr’ invocation is no longer necessary since I set the X-offset for VGA1 with xfce4-settings-editor. This script is saved somewhere  in my homedir, and is run on session-start, by adding it to the list of startup applications via Settings -> Session and Startup -> Application Autostart.

Now, let’s see where it goes 🙂

P.S. I also gave KDE a try, but it was way too slow!

Zina is not Andromeda – a fork

One of the more pleasant discoveries I did in the land of free¹ software, is a web application called Zina. Zina is a recursive acronym, that stands for ‘Zina is not Andromeda’.

Zina is basically a web front-end to your music collection, but it is more than that. It has many features, including a flash player for playing songs locally, a playlist manager, a ratings system, and much more. Once, I created my own application for this purpose, but after getting acquainted with Zina, I dropped my own ‘mp3front’, and decided to stick with Zina.

Now, as we all know, no single piece of software is perfect, and neither is Zina. The biggest drawback is, that it seems to have been abandonned by its author. The latest news posting on the homepage says:

2010 Nov: Zina is on hiatus. Author got married and bought a house.

This means that any improvents that the software might need, we will have to make ourselves.

For my own convenience, but also to open up collaboration with other interested developers, I imported Zina version 2.0b22 into a repository on Github. There, you can browse the source code, including my modifications and download the package. If you are interested in contributing, please let me know. Leave a comment here (registration required) or find me on Twitter.

From the old Help forum on Sourceforge, I understand that Zina doesn’t work with the latest Joomla releases. Since I don’t use Joomla, that would be the perfect thing for you to pick up 🙂

Let’s see where this will go!

¹ Released under GPL v2

1 5 6 7 8 9 12